How to import emails from Webmail
Follow these simple steps to import all emails and folders from your previous email provider:
1. Steps before starting the email account import
1.1 Activate the hosting or email plan
If you are in the process of transferring your domain, the first step will be to request activation of the contracted hosting or email plan. You can do this by contacting our customer service team via online chat or ticket from your client area.
1.2 Create the email account
Once the plan is activated, you will be able to access your management panel to create the email account(s), remember that you can create them with the same name you were using with your previous provider. If you don't know how to create it, you can follow the help steps How to create an email account.
1.3 Access Webmail
Once the email account is created, from the management panel, you will have access to Webmail, a web-based email manager from which you can start the import.
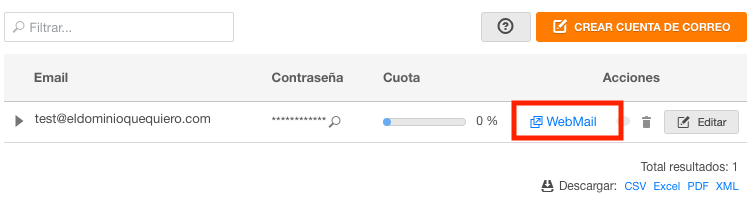
If you are transferring the domain and the process has not been completed yet, you can access Webmail from: webmail.dondominio.com using the details of the new email account created.
2. Select the tool to import email accounts
From Webmail, in the main menu on the left side, first click on Configure, and then on Import, this way you will have accessed the Email Accounts importer.
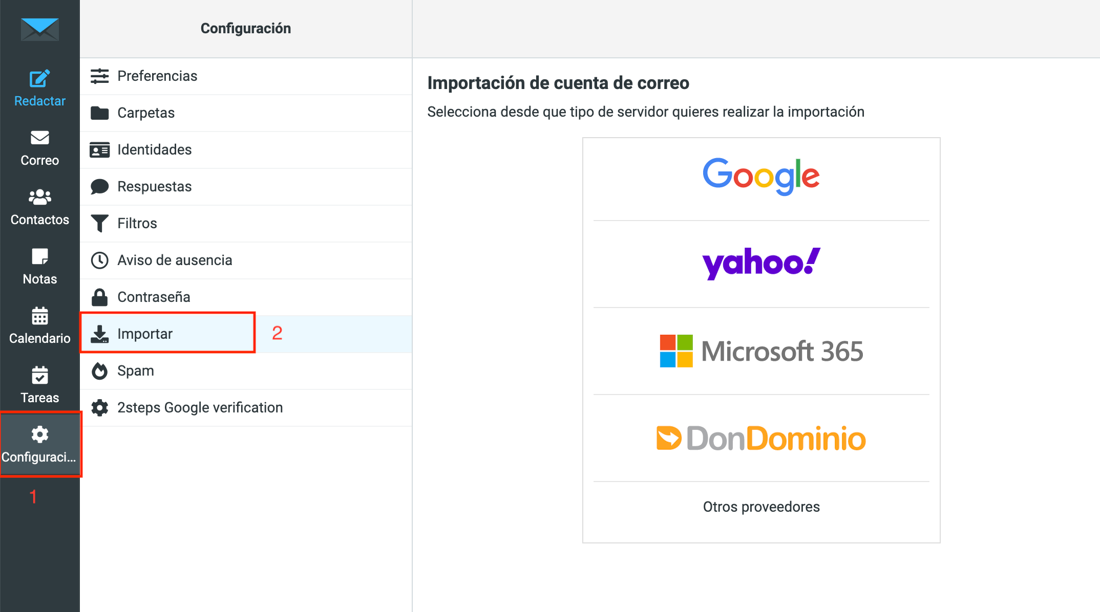
2.1. Start the import of emails and folders
You just have to select from which provider you are going to start the import, if your current provider does not appear in the list, choose the option Other providers. You can even import emails between DonDominio email accounts!
2.2. Configure the importer
The data you will need to indicate will depend on the option you have selected in the previous step. As generic data, you will need to know:
- Name of the email account you are importing from. (It can be the same if you are importing emails from another provider).
- Password of that email account.
If you have selected the option of Other servers, you will also need to know the name of the email server of your previous provider.
2.3. Check the connection and select the directories to import
After completing the requested data, click on Check connection, if the entered data is correct, a new dropdown will appear where you can select which directories/folders you want to import and to which destination you want to move them. Simply select both options and click on Import to start the process.
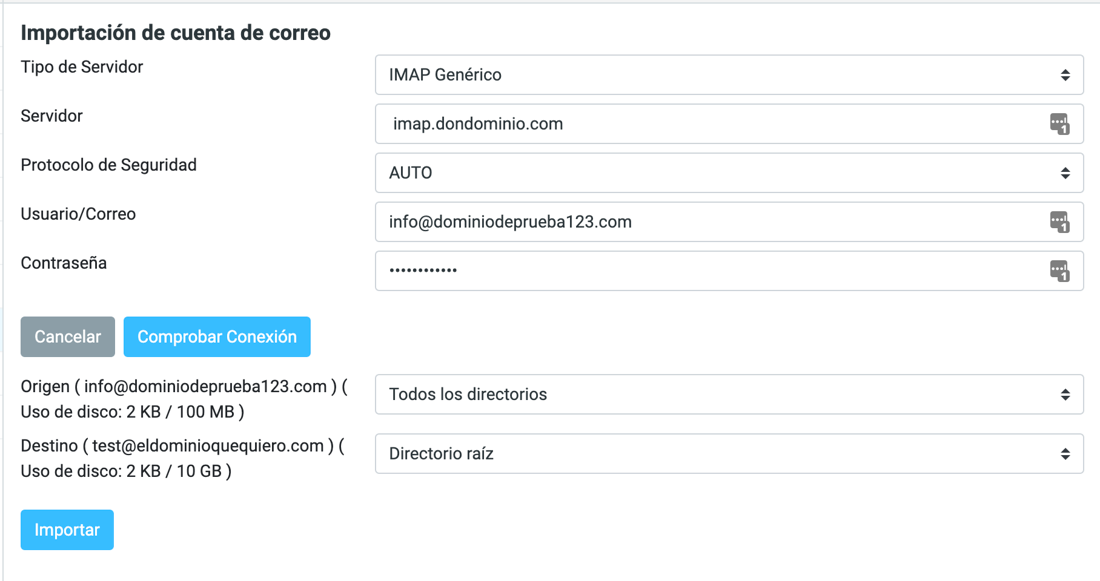
In this step, it is important to pay attention to the "Disk usage" sections, as you will be able to see the space occupied on your current provider and the space you have available in the new email account. If you do not have enough space, you will not be able to perform the import as it will result in an error. Remember that you can review the option to upgrade the plan to a higher one if you need more space.
2.4. Start the import process
Once the import has started, the Import table window will appear, where you can see the initiated import task and in "Queued" status. After a few minutes, it will start and change to "In process," a status that will last from seconds to hours depending on the size of the emails to be imported. When the import task appears as "Queued," you can close the window, and the process will be carried out automatically.

It is advisable not to make changes to the email accounts (source and destination) while the import is being carried out, as it may lead to errors while the import process is in progress.
2.5. Completion of the import process
After some time, you can return to access Webmail of the email account (or update the window where you performed the process) to check the status of the process. When it appears as "Completed," it means the process has been successfully completed.

